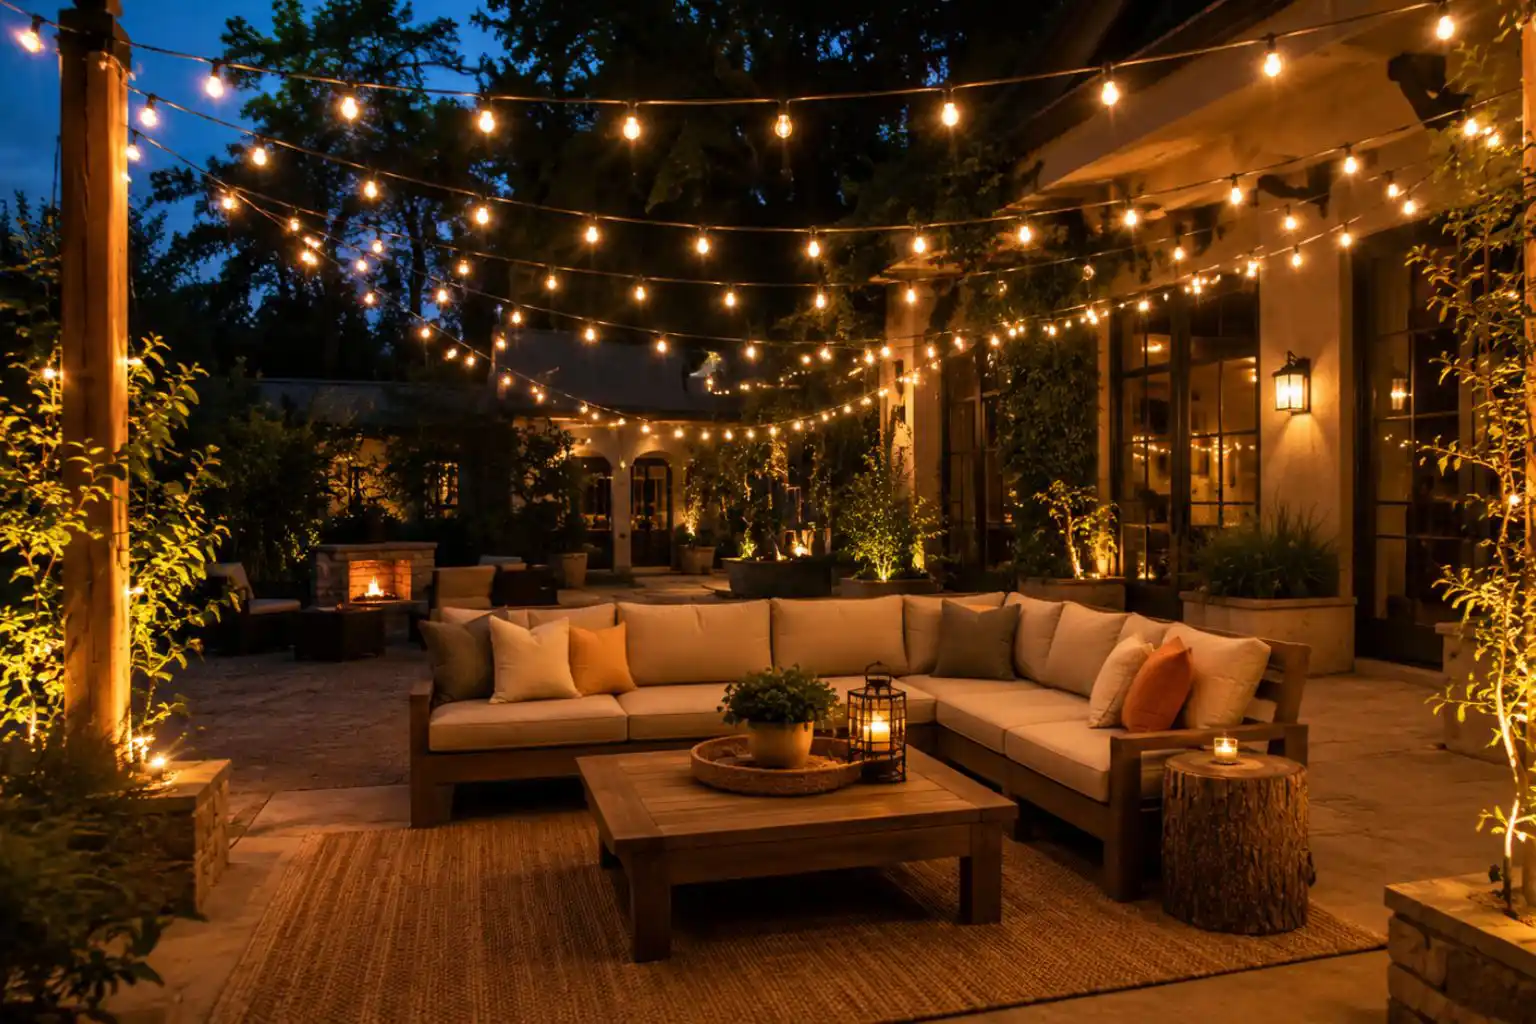
Outdoor string lights can completely transform a patio, deck, or backyard into a warm, inviting space for relaxing or entertaining. The challenge isn’t choosing the lights—it’s hanging them securely so they look great, stay level, and hold up through wind and weather.
This guide covers what the top-ranking guides leave out: no-nail methods for renters, the electrical math nobody explains, exact spacing numbers, surface-by-surface instructions, and a troubleshooting section for when things go wrong. By the end, you’ll know exactly how to hang outdoor string lights the right way, whether you’re working with trees, a bare patio, a rental, or a brick wall. For larger patios, commercial spaces, or permanent outdoor lighting installations, professional installation can help ensure straighter light runs, proper support, and long-term durability in all weather conditions.
How to Hang Outdoor String Lights: Quick Steps
- Plan your lighting layout.
- Measure the total distance and identify anchor points.
- Choose the right mounting method for your space.
- Install guide wires or mounting hardware.
- Secure the string lights evenly.
- Test the lights and adjust the sag.
- Inspect connections for safety before regular use.
Before You Buy: Plan Your Layout First
Every string light project starts on paper, not on a ladder.
- Sketch your space. Rough out your patio, deck, or yard and mark your power source (outlet or planned extension cord run).
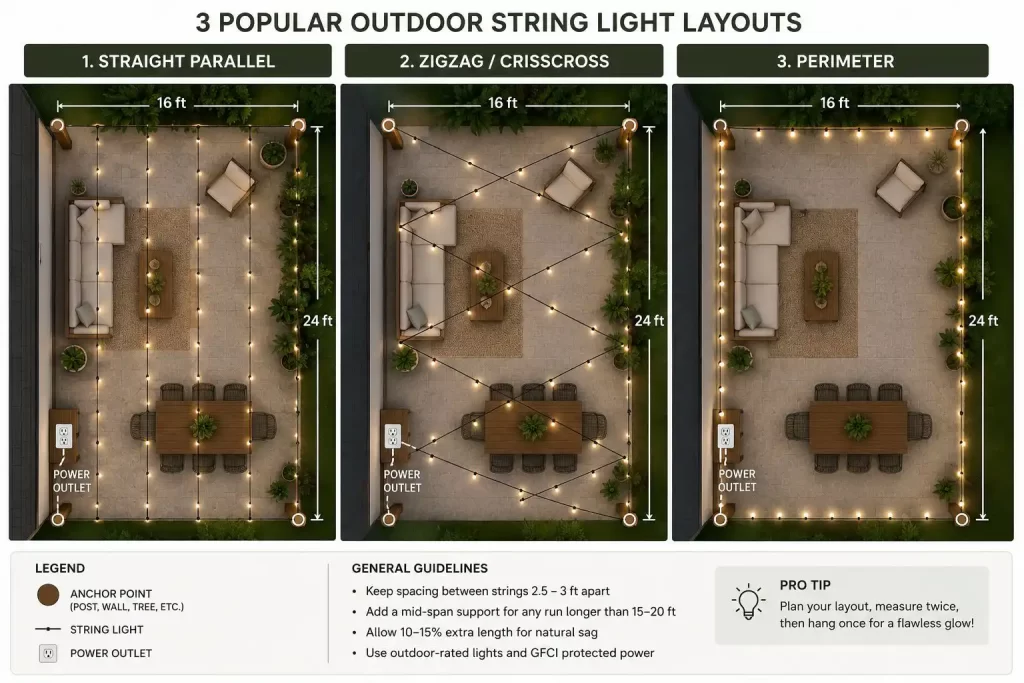
- Choose a pattern. The three most common layouts:
- Straight lines / parallel rows. Classic café look, works well over long rectangular patios.
- Zigzag / crisscross. Best for square or wide areas, creates a canopy effect and hides gaps better than straight lines.
- Perimeter. Lights follow the edge of the space (fence line, deck railing, roofline).
- Measure the run, including any “zigs” and “zags,” not just the straight-line distance between anchor points. Add 10 to 15 percent extra length to account for sag.
- Count your anchor points before you shop. You need one at each end of every span, plus a mid-span support for any stretch longer than 15 to 20 feet. Unsupported spans longer than this sag too much and put stress on the sockets.
Which Hanging Method Should You Use?
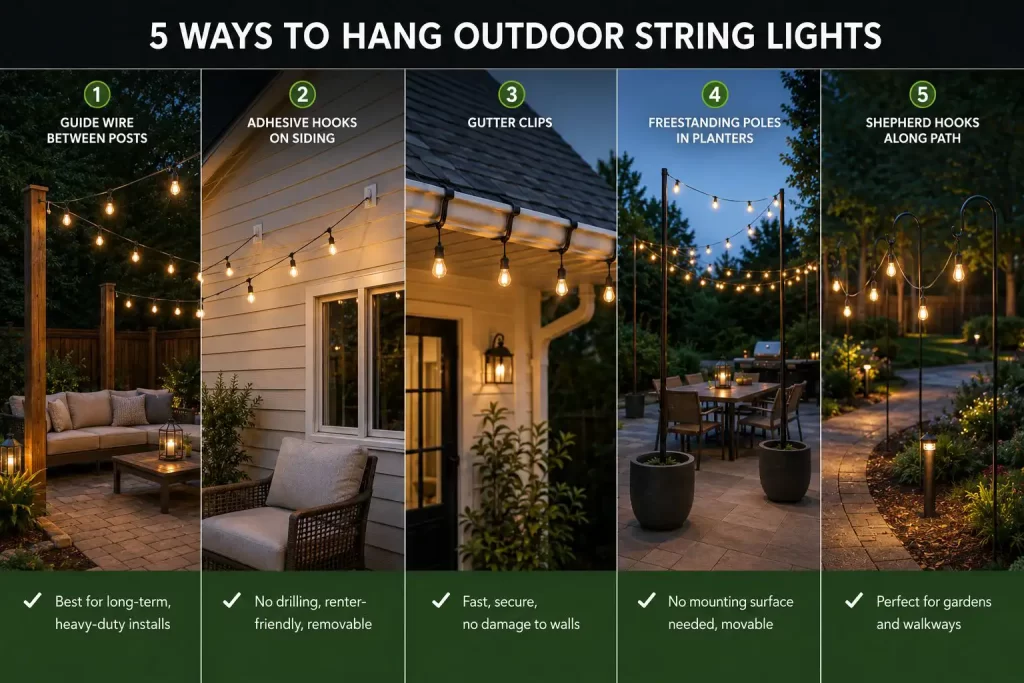
Before grabbing tools, match your situation to the right approach. This is the step most guides skip, and it saves you from buying the wrong hardware.
| Your Situation | Best Method | Permanence |
| Own your home, long-term install, heavy light load | Guide Wire Method (Method 1) | Permanent, seasonal |
| Renting, lease restricts drilling or nails | Adhesive hooks, gutter clips, hook-and-loop straps | Fully removable |
| No trees, walls, or fences nearby | Freestanding poles in weighted planters | Semi-permanent, movable |
| Small patio table or single seating area | Umbrella-pole wrap | Temporary, seasonal |
| Low-hanging accent lighting along a garden bed | Shepherd’s hooks | Temporary, movable |
Tools & Materials Checklist
- Outdoor-rated LED or incandescent string lights (check the box for a “wet location” or “damp location” rating)
- Cable/guide wire (14 to 16 gauge galvanized steel or vinyl-coated wire). This is the single biggest upgrade over hanging lights on their own cord.
- Turnbuckles (for tensioning long spans)
- Eye hooks or screw hooks (stainless or galvanized, rated for outdoor use)
- Cable clips or S-hooks
- Zip ties (UV-resistant, black or clear)
- Wire cutters/pliers
- Drill and appropriate bit for your wall material
- Sturdy ladder and a helper to hold it
- Outdoor-rated extension cord and/or timer (optional)
Pro Tip: Install all mounting hardware before opening and hanging the light strands. This makes measuring easier, reduces strain on the wiring, and helps create straighter, more even light runs.
Method 1: The Guide Wire Method (Best for Long-Term, Heavy-Duty Installs)
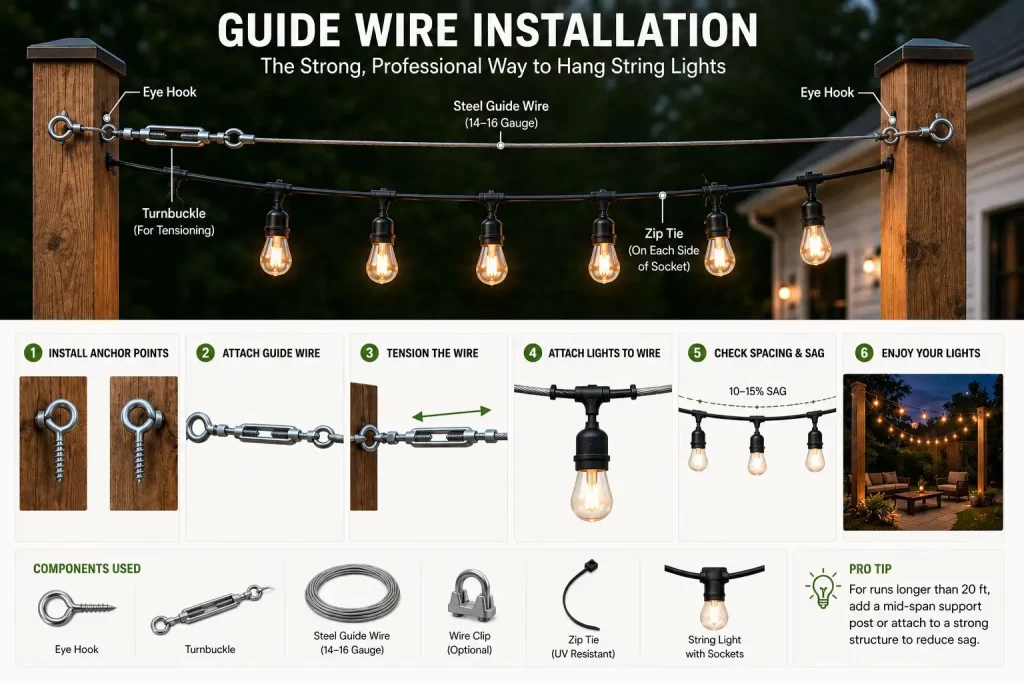
This is the method professional patio-lighting companies use, and it’s the biggest gap in most beginner tutorials. Hanging the cord itself between two points is the number one reason lights sag, stretch, and eventually fail. The fix: hang a steel cable first, then attach the lights to the cable.
Step 1. Install anchor points.
Drill pilot holes into your mounting surfaces (house soffit, posts, or sturdy tree trunks) and screw in eye hooks. Don’t drive them all the way in if you’re anchoring into wood. Stop once you feel resistance so you don’t crack the grain.
Step 2. Run the guide wire.
Attach one end of your galvanized wire to the first eye hook using a loop and wire clip. Run it to the next anchor point, and use a turnbuckle at one end so you can tighten the line later. This is what most budget guides skip: a turnbuckle lets you take the sag out after the wire stretches over its first few weeks outside.
Step 3. Tension the wire.
Pull the wire taut and tighten the turnbuckle until it’s firm but not guitar-string tight. Steel wire doesn’t stretch much, so overtightening just stresses your anchors.
Step 4. Attach the lights to the wire, not the sockets.
This is the step almost every competitor gets wrong. Never let the light string’s own cord bear its full weight over long spans.
- Use a zip tie on each side of every light socket, looping it around the guide wire.
- Don’t rely on the small built-in loop on each socket alone. It shifts in wind and eventually cracks.
- Add one extra zip tie between sockets on long runs to stop wind sway.
Step 5. Slide the cord taut, test, and trim.
Once everything is attached, slide the light cord along the wire until it’s snug, screw in any bulbs you removed for safety, plug in, and test every socket before you pack up the ladder.
Method 2: No-Nail, No-Drill Methods (For Renters & Rental-Safe Setups)
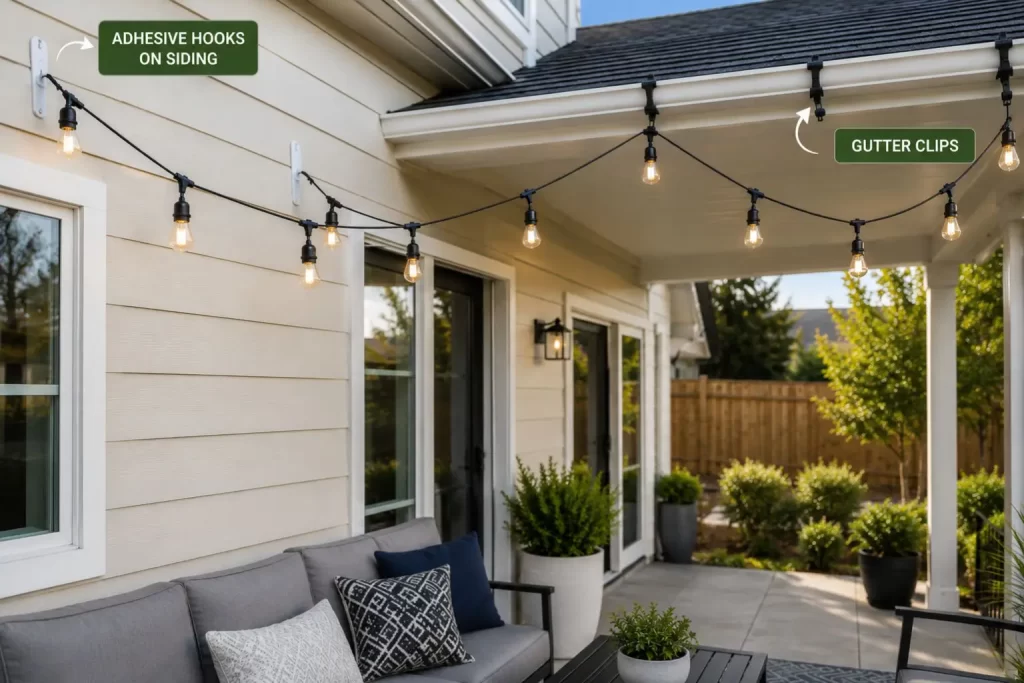
If you’re searching for how to hang outdoor string lights without nails, you have more options than most guides admit:
- Adhesive hooks rated for outdoor use. Look for ones rated to hold at least 5 to 7 lbs per hook. Outdoor-rated adhesive hooks work on smooth siding, glass doors, and painted trim but not on rough stucco or brick.
- Gutter hooks/gutter clips. Clip directly onto a fascia gutter with zero drilling, and remove cleanly at the end of the season.
- Tension rods or freestanding poles. Set 10-foot poles into large planters filled with quick-set concrete, sand, or gravel. This is the go-to option if you have no trees, walls, or fences to anchor into at all.
- Shepherd’s hooks. Inexpensive garden stakes pushed into soil, good for low-hanging light runs along a garden bed or fence line, not for overhead canopies.
- Umbrella-pole wrap. For a small patio table, zip-tie the string around the umbrella’s center pole and weave the rest around the support arms. No drilling, no permanent anchors, and it comes down in minutes.
- Velcro or hook-and-loop straps. Reusable adhesive or wrap-around straps work well on railings, pergola beams, and posts where you want a fast, damage-free attachment you can reposition.
Renter tip: if your lease prohibits exterior alterations, stick to freestanding poles, adhesive hooks, and umbrella/railing wraps. None of these penetrate siding or trim.
When DIY Installation Makes Sense
DIY installation is a great option for:
- Small patios and decks
- Pergolas and gazebos
- Rental properties using removable mounting methods
- Temporary seasonal lighting
For large backyards, commercial properties, rooflines, or permanent outdoor lighting systems, professional installation is often the safer and more reliable choice.
How to Hang String Lights by Surface
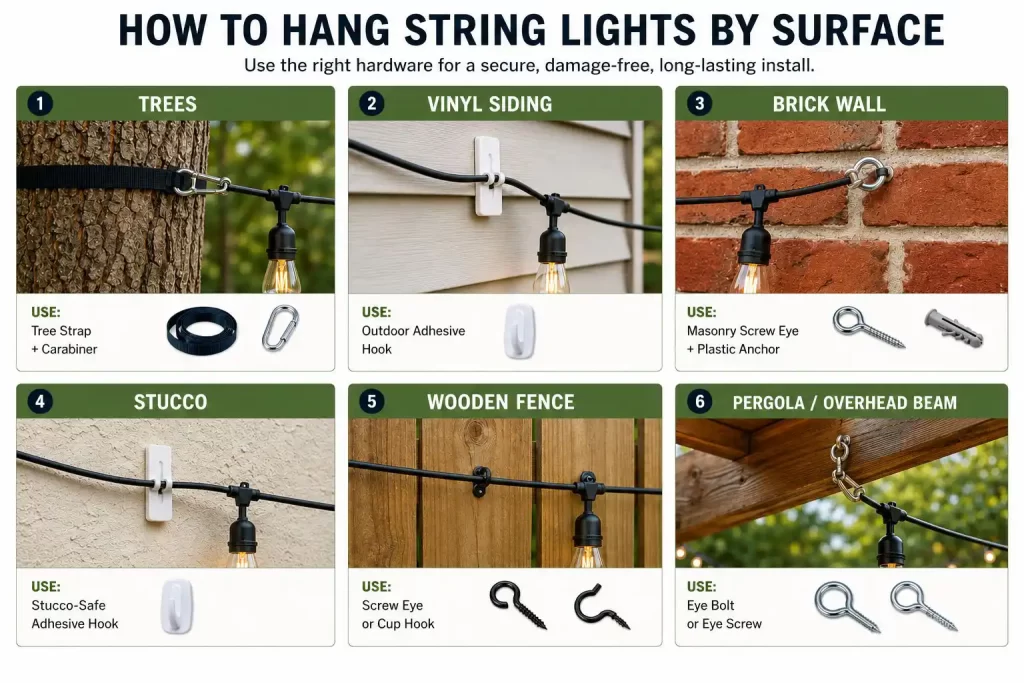
Most competitor guides only cover trees and soffits. Here’s what to do on every common surface:
| Surface | Best Method |
| Trees | Eye hooks screwed into the trunk (not branches, they move too much and can snap); use a rubber tree-friendly strap for a no-damage option |
| Vinyl siding | Never drill directly into vinyl, it cracks. Use vinyl siding hooks that clip under the lip of a siding panel |
| Brick or masonry | Pre-drill with a masonry bit and use wall anchors before screwing in the eye hook; brick screws alone will strip out |
| Stucco | Use masonry anchors, and patch the hole with stucco caulk if you remove the hook later |
| Wood fence/deck railing | Staple gun (galvanized staples) along the underside of the rail so staples stay hidden, or use cup hooks screwed into the rail cap |
| Pergola/gazebo beams | Screw hooks directly into the beam. These are usually the sturdiest anchor point on a property |
| No structures at all | Freestanding poles set in weighted planters, or shepherd’s hooks for ground-level runs |
The Electrical Math Nobody Talks About
This is the single biggest content gap across every major competitor guide, and it’s the difference between a safe install and a tripped breaker (or worse):
- Check your outlet’s amperage. A standard 15-amp household circuit supports roughly 1,800 watts. Add up the wattage of every string of lights and anything else on that circuit before you plug in.
- Respect the “end-to-end” connection limit. Manufacturers typically allow up to 3 to 5 strands of shorter (under 48 ft) light strings to be connected end to end, and fewer for longer or higher-wattage strands. Exceeding this overloads the wiring inside the cord itself. Check the tag on your specific lights.
- Use a GFCI-protected outlet. Any exterior outlet should already be GFCI-protected by code. If yours trips repeatedly, that’s a sign of overload or a wet connection, not a faulty GFCI.
- Keep plug connections off the ground. Use a covered outlet cover or elevate the connection point so rain and sprinklers can’t reach it.
- LED vs. incandescent matters here. LED string lights use roughly 80 to 90 percent less power than incandescent, meaning you can safely connect far more strands end to end. That’s a meaningful reason to choose LED beyond just bulb life.
Spacing, Sag, and Getting the “Café” Look Right
- For a classic relaxed drape (the look in most restaurant patios), let the line sag about 10 to 15 percent of the span length. A 20-foot run should dip roughly 2 to 3 feet at its lowest point.
- For a taut, structured look, tension the guide wire tighter and keep the sag under 5 percent.
- Space intermediate support points (extra hooks or poles) every 15 to 20 feet on any run to prevent excessive sag or stress on the end anchors.
- Hang overhead runs at a minimum of 9 feet off the ground, or higher if the space is walked through, so lights clear people’s heads and don’t get tangled in patio umbrellas.
Common Mistakes (And How to Avoid Them)
- Hanging lights on their own cord over long spans. The cord stretches, sags, and eventually pulls sockets apart. Always use a guide wire for anything over about 15 feet.
- Not planning around the power source. Figure out your outlet location before you buy lights, not after; otherwise, you’re stuck running an extension cord across a walkway.
- Mounting hooks into weak or rotten wood. Test every hook by hand before hanging any weight. A hook that spins freely in the wood will pull out under load.
- Using indoor-rated lights outdoors. Always confirm a “wet location” or “damp location” rating on the packaging. Indoor lights can short out or become a fire hazard in rain.
- Relying only on socket loops instead of zip ties. Loops shift and loosen with wind. Zip ties on both sides of each socket hold far better long term.
- Overloading one circuit. Add up your total wattage before connecting multiple strands.
Maintenance & Seasonal Storage
- Check connections after storms. Wind is the most common cause of loosened zip ties and shifted hooks.
- Re-tension the guide wire once a season. Steel wire and turnbuckles let you tighten the run back up as it settles.
- Take lights down (or unplug them) before freezing weather if they’re not rated for winter storage, and coil them loosely. Tight winding cracks cold plastic housings.
- Store bulbs separately from cords if using industrial-style lights with removable bulbs, to avoid breakage in the off-season box.
- Clean solar panels on solar-powered string lights periodically. Dust and pollen buildup is the number one reason solar lights dim over a season.
- A string that suddenly goes dark or flickers usually comes down to the same handful of causes, whether it’s on your patio or your Christmas tree. Our guide on how to fix Christmas lights walks through the most common fixes step by step and applies just as well to outdoor string lights that stop working.
FAQ
How do you hang string lights outside without trees?
Use deck railings, fence lines, or house siding as anchor points. If none are available, set freestanding poles into weighted planters or use shepherd’s hooks.
What can I use to hang outdoor string lights if I can’t drill holes?
Adhesive outdoor hooks, gutter clips, or hook-and-loop straps. All attach without drilling and remove cleanly.
How far apart should hooks be for string lights?
Every 15 to 20 feet for supported spans, closer together (every 3 to 4 feet) if attaching lights to a guide wire with zip ties.
Can you leave outdoor string lights up all year?
Yes, if they’re rated for wet or damp locations. Unplug and inspect them after major storms, and take them down before freezing weather if not winter-rated.
How do you keep outdoor string lights from blowing in the wind?
Attach them to a tensioned guide wire using zip ties on both sides of each socket, not just the built-in loop, which is what actually keeps them stable in wind.
What type of wire is used to hang string lights?
14- to 16-gauge galvanized steel or vinyl-coated wire, paired with a turnbuckle for tensioning.
How many string lights can you connect together?
Usually 3 to 5 strands end to end for shorter runs, fewer for longer or higher-wattage ones. Check the tag on your specific lights.
Do outdoor string lights need to be on a GFCI outlet?
Yes, any exterior outlet should already be GFCI-protected. It’s required for outdoor electrical safety.
How high should you hang string lights over a patio?
At least 9 feet, so they clear heads and don’t tangle with umbrellas or furniture.
Are LED or incandescent string lights better for outdoor use?
LED lights use far less power, run cooler, and last longer, letting you connect more strands safely. Incandescent lights give a warmer glow but draw more wattage.
Do outdoor string lights attract bugs?
Yes, especially warm-toned incandescent and yellow bulbs. LED and warm-white LED bulbs attract fewer insects.
Final Thoughts
The difference between a Pinterest-worthy patio and a sagging cord that trips your breaker every other night comes down to three things: a tensioned guide wire, correct spacing, and respecting the electrical limits of your outlet. Nail those, and any of the layouts above- zigzag, straight lines, or perimeter- will hold up through wind, rain, and years of evening dinners outside.
If you’re comfortable with basic tools and working at height, many smaller installations can be completed in an afternoon. For larger or more permanent projects, professional installation can save time while ensuring a clean, long-lasting result.
Whether you’re creating a cozy backyard retreat, lighting a patio for entertaining, or planning a permanent outdoor lighting system, The Works Lighting Services can design and install a professional solution that’s secure, weather-resistant, and built to last. Contact our team today to discuss your outdoor lighting project.